kolla 简介
Kolla’s mission is to provide production-ready containers and deployment tools for operating OpenStack clouds.
Kolla 的使命是为运营 OpenStack 云提供生产就绪的容器和部署工具。
kolla是怎么实现生产级别的部署工具? kolla使用了两种主要的技术:ansible自动化工具和docker容器。 通常说的kolla指的的是kolla,kolla-ansible两个项目。kolla 主要负责OpenStack的docker镜像的构建,kolla-ansible 通过ansible部署kolla的镜像的playbook。
实际上,根据 kolla还有个Kayobe 项目, 我理解它是用于管理OpenStack集群工具,目前用的人不多。
还有一个项目 Kolla-kubernetes,在kubernetes上部署OpenStack。但是和另一个项目 openstack-helm 重合较多,让官方叫停了 。
kolla build images kolla-build是一个自动化构建OpenStack服务所需要的镜像工具。仓库中包含大量的Dockerfile,供构建docker镜像的使用。
实际上部署通过kolla-ansible部署OpenStack,是不需要kolla-build的。kolla-ansible在部署时会检测镜像,如果镜像没有准备好就会从docker远程仓库Pull对应的镜像,然后在执行deploy。
一般来说生产环境搭建环境,因为网络原因部署的速度是比较慢的。最好使用本地镜像仓库,这就需要我们自己构建镜像,下面详细介绍kolla本地构建镜像。
kolla镜像划分
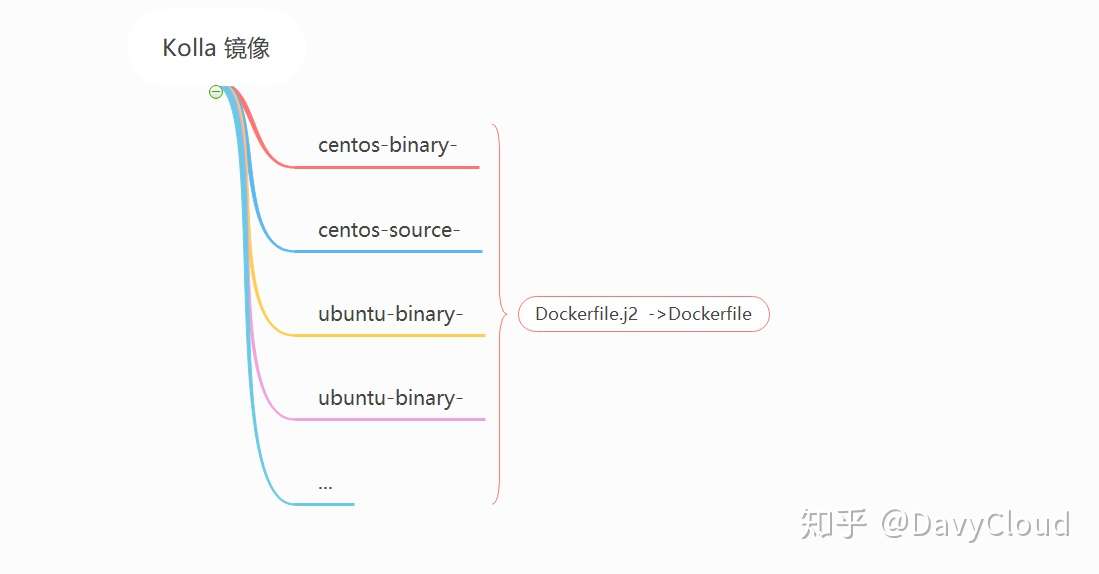
kolla镜像目前已达到个2345个,实际上不是完全独立的2345个服务。而是针对不同的场景分别构建,达到全面覆盖的结果。同时支持binary和source两种构建方案,而且支持不同的操作系统CentOS,Ubuntu,Debian作为基础镜像,可以满足用户不同的需求。同时也支持在不修改源代码情况下,对镜像进行定制。
kolla镜像分层 OpenStack中有很多服务隶属同一个项目。例如,nova-api, nova-conductor,nova-scheduler,nova-compute等等都输于Nova项目,所以,kolla先构建一个通用的nova-base镜像,然后在此基础上分别构建不同的服务。
1
2
3
4
5
6
7
8
9
10
11
12
13
14
15
16
docker/ ├── base │ └── Dockerfile.j2 ├── horizon │ └── Dockerfile.j2 ├── mariadb │ └── Dockerfile.j2 ├── nova │ ├── nova-api │ │ └── Dockerfile.j2 │ ├── nova-base │ │ └── Dockerfile.j2 │ └── nova-compute │ └── Dockerfile.j2 └── openstack-base └── Dockerfile.j2
镜像功能划分 kolla项目不仅仅吧OpenStack服务集成了,而且把基础服务也包含在内。如 mariadb,rabbitmq,memcache等等。
kolla构建镜像 kolla已经涵盖了2000多个镜像,基本上涵盖了大部分软件。如果说这里没有我们需要的应用版本,也可以通过编写Dockerfile来解决。下面我分为三步快速的构建kolla镜像。
准备环境
修改kolla-build.conf配置
构建kolla镜像
准备环境 操作系统: Ubuntu Server18.04
1
2
3
4
5
6
7
8
9
10
11
12
13
14
15
16
17
18
19
20
21
22
23
24
25
26
# 安装docker apt-get remove docker docker-engine docker-ce docker.io apt-get install apt-transport-https ca-certificates curl software-properties-common -y curl -fsSL https://download.docker.com/linux/ubuntu/gpg | sudo apt-key add - add-apt-repository "deb [arch=amd64] https://mirrors.ustc.edu.cn/docker-ce/linux/ubuntu $(lsb_release -cs) stable" apt-get update -y apt-get install docker-ce -y # 安装pip3 apt install python3-pip python3-venv # 使用Python虚拟环境 python3 -m venv .virtualenvs/kolla-build source .virtualenvs/kolla-build/bin/activeate # 安装kolla-build命令 pip3 install kolla # 安装tox pip3 install tox # clone kolla代码git clone https://github.com/openstack/kolla.git -b stable/victoria # 生成 etc/kolla/kolla-build.conf tox -e genconfig -i https://pypi.tuna.tsinghua.edu.cn/simple
kolla-build.conf配置 vim etc/kolla/kolla-build.conf
1
2
3
4
5
6
7
[DEFAULT] base = debian # 基础镜像 可选centos,debian,ubuntu。默认centos base_arch = x86_64 # 基础镜像架构x86_64 skip_existing = true # 跳过已构建的镜像 registry = leifeng.harbor.com # 指定镜像仓库 install_type = source # 安装OpenStack类型,可选source,binary。 推荐source 源码安装 openstack_branch = victoria # openstack 版本
构建kolla基础镜像base 1 kolla-build --config-file etc/kolla/kolla-build.conf ^base
Note: ^base前面的^符合不能省略,这里使用了正则表示式,匹配句首为base的image。如果缺少该参数会构建openstack-base,nova-base等等包含base字段的image。
修改base镜像debian apt源 pip源 默认base镜像使用的是国外的apt源,国内下载软件速度会很慢。而且构建失败的镜像较多。
更改debian apt源可以直接修改base对应的 docker/base/Dockerfile.j2源码。
1
2
3
4
5
6
7
8
9
10
11
12
13
14
15
16
17
18
19
20
... {% elif base_distro == 'debian' %} {% set base_apt_keys = [ '46095ACC8548582C1A2699A9D27D666CD88E42B4', 'F1656F24C74CD1D8', 'F77F1EDA57EBB1CC', 'F6609E60DC62814E', ] %} {% set remote_apt_keys = [ 'https://download.docker.com/linux/debian/gpg', 'https://packages.grafana.com/gpg.key', 'http://buster-ussuri.debian.net/debian/dists/pubkey.gpg', 'https://packages.treasuredata.com/GPG-KEY-td-agent', 'https://repos.influxdata.com/influxdb.key', 'https://obs.linaro.org/repos/home:/marcin.juszkiewicz/debian-buster/Release.key', ] %} {% set base_apt_packages = base_apt_packages + ['sudo',] %} {% endif %}
和修改源码相比我更喜欢等base镜像构建完成,直接在base镜像上修改apt源和pip源。
1 2 3 4 5 6 7 8 9 10 11 12 13 14 15 16 17 18 19 20 21 22 23 24 25 26 27 vim sources.list deb http://mirrors.aliyun.com/debian/ buster main non-free contrib deb-src http://mirrors.aliyun.com/debian/ buster main non-free contrib deb http://mirrors.aliyun.com/debian-security buster/updates main deb-src http://mirrors.aliyun.com/debian-security buster/updates main deb http://mirrors.aliyun.com/debian/ buster-updates main non-free contrib deb-src http://mirrors.aliyun.com/debian/ buster-updates main non-free contrib deb http://mirrors.aliyun.com/debian/ buster-backports main non-free contrib deb-src http://mirrors.aliyun.com/debian/ buster-backports main non-free contrib vim pip.conf [global] timeout = 6000index-url = http://mirrors.aliyun.com/pypi/simple/ trusted-host = mirrors.aliyun.com vim Dockerfile FROM leifeng.harbor.com/kolla/debian-source-base:11.2.1 COPY pip.conf /etc/pip.conf COPY sources.list /etc/apt/sources.list RUN pip install --upgrade pip setuptools docker build -t leifeng.harbor.com/kolla/debian-source-base:11.2.1-leifeng .
构建kolla镜像 1 kolla-build --config-file etc/kolla/kolla-build.conf --tag 11.2.1-leifeng -p default
kolla-build 常用参数说明
–config-file 指定kolla-build.conf路径
–tag 指定镜像tag
–skip-existing 跳过已构建好的镜像
–push 镜像构建完成后push到仓库中
–registry 指定镜像仓库
-p –profile 指定需要构建的一组镜像列表。默认存在infra,main,aux,default。可以通过kolla-build -p default –list-images 查看镜像列表
1
2
3
4
5
6
7
8
9
10
11
12
13
14
15
16
17
[profiles] # # From kolla # # Infra images (list value) #infra = certmonger,cron,elasticsearch,etcd,fluentd,haproxy,hacluster,keepalived,kibana,kolla-toolbox,logstash,mariadb,memcached,openvswitch,ptp,qdrouterd,rabbitmq,redis,rsyslog,skydive,storm,tgtd # Main images (list value) #main = ceilometer,cinder,glance,heat,horizon,iscsi,keystone,neutron,nova-,placement,swift # Aux Images (list value) #aux = aodh,blazar,cloudkitty,designate,ec2-api,freezer,gnocchi,influxdb,ironic,kafka,karbor,kuryr,magnum,manila,masakari,mistral,monasca,murano,novajoin,octavia,panko,qinling,rally,redis,sahara,searchlight,senlin,solum,tacker,telegraf,trove,vitrage,zaqar,zookeeper,zun # Default images (list value) #default = chrony,cron,kolla-toolbox,fluentd,glance,haproxy,heat,horizon,keepalived,keystone,mariadb,memcached,neutron,nova-,placement,openvswitch,rabbitmq
NOTE: 第一次构建所有镜像,时间较长。如果出现异常中断的,可以重复执行。
指定Nova源码构建镜像 构建完成后Nova的源代码来自 https://tarballs.opendev.org/openstack/nova/nova-stable-victoria.tar.gz 。大部分情况下,我们只需要构建有代码提交的仓库,其他的镜像不需要重新构建。根据kolla镜像分层 的原理我们只需要从nova-base开始构建就可以了。
基于刚才构建好的debian-source-nova-base:11.2.1镜像,重新构建Nova镜像, 文章中我使用为nova victoria版本源代码。你可以替换为公司的源代码。kolla支持git,local,url三种方式安装Nova源代码,这里以local为例。
1
2
3
4
5
6
7
8
9
10
11
12
13
14
15
16
17
18
19
20
21
22
23
24
25
26
mkdir /home/github/git clone https://github.com/openstack/nova.git -b stable/victoria [nova-base] local = /home/github/nova kolla-build --config-file etc/kolla/kolla-build.conf ^nova
参考
管理2000+Docker镜像,Kolla是如何做到的 Install and configure OpenStack Pike with Kolla as a standalone OpenStack Kolla build images